Key Points on Wrapping a Sprained Ankle
- Research suggests that proper compression with an elastic bandage can help reduce swelling and support healing for mild to moderate ankle sprains, though it's not a substitute for professional medical advice.
- It seems likely that using a figure-eight wrapping pattern provides the best stability, but always check for signs of poor circulation like numbness or tingling to avoid complications.
- The evidence leans toward starting the wrap at the ball of the foot and extending several inches above the ankle for optimal coverage.
- Controversy exists around self-taping versus seeking help; while DIY wrapping is common for minor injuries, severe cases may require evaluation to rule out fractures.
Why Wrap a Sprained Ankle? Wrapping applies gentle compression as part of the RICE method (Rest, Ice, Compression, Elevation), which may aid in managing swelling and pain from ligament strains. This technique is widely recommended for at-home care but should be done carefully to prevent restricting blood flow.
Materials Needed
- Elastic bandage (e.g., 4-inch width for adults, latex-free cotton for comfort).
- Clips or tape to secure.
- Optional: Padding like gauze for extra support.
Quick Step-by-Step Guide
- Position your ankle at a 90-degree angle and start at the ball of the foot.
- Wrap around the foot 2-3 times, then move to a figure-eight pattern over the ankle and heel.
- Overlap each layer by half, extending 5-6 inches above the ankle.
- Secure and check for comfort—loosen if needed. For products, consider Hospora's latex-free elastic bandages (available at www.hospora.com/product-category/elastic-bandage/).
When to Seek Help If pain persists, swelling increases, or you can't bear weight, consult a doctor to avoid long-term issues.
Sprained ankles are one of the most common injuries, affecting athletes, active adults, and even those just navigating everyday uneven surfaces. According to health experts, an ankle sprain occurs when ligaments are stretched or torn, leading to pain, swelling, and instability. While severe cases may require medical imaging or professional intervention, mild to moderate sprains can often be managed at home using the RICE protocol: Rest, Ice, Compression, and Elevation. Compression, in particular, plays a key role in reducing swelling by limiting fluid buildup around the injured area. This guide focuses on how to properly wrap a sprained ankle with an elastic bandage, drawing from established medical recommendations to ensure safe and effective application.
Using an elastic bandage—such as Hospora's FDA-registered, latex-free cotton options—provides gentle support without the rigidity of a brace, making it ideal for initial injury management. However, it's essential to note that wrapping is not a cure and should be combined with rest and elevation. If you're unsure about the severity of your injury, always err on the side of caution and seek professional advice, as untreated sprains can lead to chronic instability or arthritis.
Understanding Ankle Sprains and the Role of Compression
Ankle sprains are classified into three grades: Grade 1 (mild stretching), Grade 2 (partial tear), and Grade 3 (complete tear). Symptoms include pain, bruising, and difficulty walking. Compression helps by applying even pressure to minimize swelling, but it must be applied correctly to avoid complications like reduced circulation or skin irritation. Medical sources emphasize starting compression soon after injury but only for the first 24-48 hours intensively, then as needed.
For best results, choose a bandage width suited to the area—4 to 6 inches is typically recommended for ankles to provide adequate coverage without bunching. Hospora's conforming elastic bandages, available in various sizes, are designed for this purpose, offering breathability and reusability.
Preparations Before Wrapping
Before beginning, gather your materials and prepare the area:
- Ensure the ankle is clean and dry to prevent infection.
- Sit or lie down with the injured foot elevated to reduce initial swelling.
- Position the ankle at a neutral 90-degree angle (foot perpendicular to the leg) to promote proper alignment during wrapping.
- If available, add padding around bony areas like the ankle bones for extra comfort and to fill gaps, reducing pressure points.
Optional but helpful: Apply ice wrapped in a cloth for 20 minutes before bandaging to numb pain and start reducing inflammation. Avoid direct ice contact to prevent frostbite.
Detailed Step-by-Step Wrapping Instructions
Follow these steps for a secure, figure-eight wrap, which provides optimal support by crossing over the ankle joint. This pattern is preferred because it stabilizes the heel and arch while allowing some flexibility.
- Unroll and Position the Bandage: Take your elastic bandage (e.g., Hospora's 4-inch latex-free cotton elastic bandage) and unroll a small section. Hold the roll so the loose end is facing up and away from the foot, like an underhand toilet paper roll. Start at the ball of the foot, just behind the toes, with the loose end placed on the side of the foot.
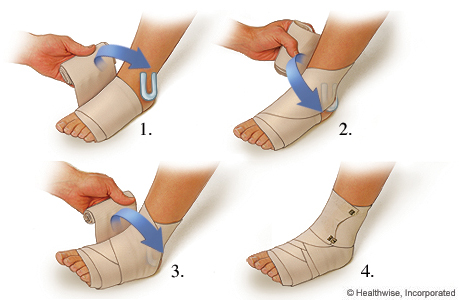
- Initial Wraps Around the Foot: Wrap the bandage around the ball of the foot once or twice, keeping it slightly taut but not tight. Each subsequent layer should overlap the previous one by about half its width (typically 1-2 inches) to ensure even compression. This anchors the bandage and covers the forefoot.
- Transition to the Ankle: Continue wrapping upward, moving toward the ankle. As you reach the heel, leave it partially exposed initially to allow for the figure-eight pattern. Circle the ankle once to secure the transition.

- Apply the Figure-Eight Pattern: This is the key stabilizing step. From the ankle, cross the bandage over the top of the foot (instep), then under the arch, and back up around the heel. Repeat this figure-eight motion 2-3 times, ensuring it covers the heel on the downward pass and extends slightly up the calf on the upward pass. This crisscross provides joint support and helps control swelling.
:max_bytes(150000):strip_icc()/elastic-bandages-1298333_v2-5c5d0649c9e77c00010a4825.png)
- Extend Upward and Secure: Continue the spiral wraps up the lower leg, overlapping by half until you reach 5-6 inches above the ankle. The wrap should end mid-calf for full coverage. Secure the end with provided metal clips, medical tape, or by tucking it under the final layer. Avoid Velcro if it irritates the skin.

- Check and Adjust: Gently press your fingers into the wrap to ensure it's snug but not constricting. You should be able to fit one or two fingers underneath. Test circulation by pressing on a toenail—it should turn white then pink quickly. If toes feel cold, numb, tingly, or turn blue/purple, loosen immediately.
The entire process should take 5-10 minutes. Re-wrap every few hours or if it loosens, and remove the bandage at night unless advised otherwise by a doctor.

Tips for Effective and Safe Wrapping
- Frequency: Remove the wrap at least twice daily for 30 minutes to allow blood flow and inspect the skin. Reapply as swelling decreases.
- Combining with RICE: After wrapping, elevate the ankle above heart level and apply ice over the bandage (wrapped in a towel) for 20-minute sessions.
- Product Recommendations: For reliable options, Hospora's sterile, conforming elastic bandages are ideal—check their 4-inch rolls for ankle use at www.hospora.com/product-category/elastic-bandage/.
- For Children or Smaller Ankles: Use a narrower 2-3 inch bandage and monitor closely, as kids may not report discomfort.
- Maintenance: Wash the bandage in mild soap and air-dry to maintain elasticity; replace if it stretches out.
Common Mistakes and How to Avoid Them
To enhance safety, here's a table outlining frequent errors based on expert guidance:
| Mistake | Description | How to Avoid |
|---|---|---|
| Wrapping Too Tightly | Restricts blood flow, causing numbness, tingling, or discoloration. | Start with light tension; check circulation every 10-15 minutes initially. Loosen if symptoms appear. |
| Incorrect Overlap | Uneven layers lead to pressure points or slippage. | Always overlap by at least half the bandage width for smooth, uniform compression. |
| Starting at the Wrong Point | Beginning too high or low fails to support the full injury area. | Always start at the ball of the foot and extend above the ankle. |
| Using the Wrong Size | Narrow bandages may cut off circulation; wide ones bunch up. | Select 4-6 inches for adult ankles; test fit before applying. |
| Not Removing Periodically | Prolonged use hinders healing and risks skin issues. | Unwrap twice daily and during sleep unless directed by a healthcare provider. |
| Ignoring Padding | Bony areas get irritated without cushioning. | Add gauze or foam pads around ankle bones for comfort. |
When to Stop Wrapping and Seek Professional Help
Stop wrapping and consult a healthcare provider if:
- Swelling worsens despite compression.
- You experience severe pain, inability to bear weight, or deformity.
- Numbness, cold toes, or color changes persist after loosening.
- The injury doesn't improve after 48 hours, or you suspect a fracture (e.g., from a high-impact fall).
In such cases, a doctor may recommend imaging, physical therapy, or a brace. For ongoing support, explore Hospora's range of wound care products at www.hospora.com.
By following this guide, you can manage a sprained ankle effectively at home, promoting faster recovery. Remember, while self-care is empowering, professional evaluation ensures no underlying issues are missed. Stay safe and active!
Key Citations:
- Sprained Ankle: Symptoms, Treatment, Recovery Time, and More
- How To Tape a Sprained Ankle
- What Do I Do to Treat a Sprained Ankle?
- Injured? This Is When You Should Be Using a Compression Bandage
- How to Wrap a Sprained Ankle: 14 Steps (with Pictures) - wikiHow
- Sprained Ankle: Symptoms, Types, Treatment & Recovery
- Sprained ankle - Diagnosis and treatment - Mayo Clinic


0 comments